Thursday, March 29, 2018

Random Projects

Greetings and welcome to another segment of the Ralston Creek Railroad Blog. It's a few days before Easter and the current weather conditions are 33 degrees with snow. I guess the lawnmower is going to hibernate a little bit longer. Which makes perfect conditions for more model railroad projects.

 My first project, more of a tip. Is a touch up paint for Krylon's Sea Glass Green spray paint I use on a number of Penn Central projects. One issue using the spray paint, was not having a touch up paint for those happy little accidents.
The dreaded handrail ding with missing paint and some touch up needed for the platform and stairs. Apple Barrel Multi-Surface to the rescue!


Their Acapulco color seemed to be the best match to Krylon's Sea Glass Green.


Looking a little more pulled together. Not a perfect match, but close enough to work.

Another project that has been in the works, is the upgrading of my reefer fleet. I have several Accurail 40ft reefers that I have collected over the years. A fairly nice model for those non-rivet counters that want to add some reefers to their roster. 


 As John R. and I have discussed in the past, one of my quirks as a modeller is duplicate road numbers. My first step in the project was to remove the existing number and give it a new one.


Using both Solvaset and later 91% Rubbing Alcohol failed to safely remove the road number. I was lucky to have the Accurail number patches that matched the Santa Fe reefers. Lesson learned!


The renumbered and weathered Santa Fe Reefer. One thing I don't care for the Accurail number patches, is the raised bump they leave on the side of the car. I've found the weathering helps conceal the raised appearance of the new number and helps seal it on the paint.


The other side of the reefer. I use cheap acrylic paints from the craft store for my weathering. I used to use chalks and powders to weather with. But I found they do not put up with much handling. I hope to find a way to mix the chalk and acrylics and make a gritty paste with them. Maybe they will hold up better to handling the cars, that way.


For less than a dollar a bottle, these acrylic paints make great weathering washes. I dilute them with water before using them on the models. Sometimes I will use alcohol to help get the washes thinned out. However the alcohol will wipe out some paint and lettering, use with caution.


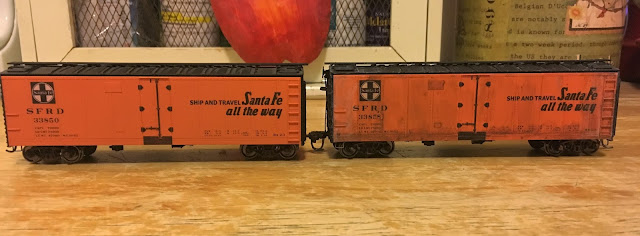
Before and after comparison between the original and the renumbered and weathered car.


One thing I learned from using the washes, is patience and letting things set up between coats. I spent several half hour sessions working on this and another car. I wanted to get it done in one evening, but  couldn't get the coats of paint to cooperate. I hope this gives you some ideas and tips for weathering. Thanks for reading!


Monday, March 19, 2018

P.C.C.M. 45C Cicero Yard and Beyond.

Greetings and welcome to the third installment of P.C.C.M.45 In the last installment we saw three cars getting dispatched on the next train from Denver's 31st Street Yard to Cicero Yard in Chicago. We pick up the action at Cicero Yard. The Penn Central has sent a local yard transfer from their 59th Street Yard to Cicero. The Burlington yard switcher works on getting the cars switched over to the Penn Central.


Here we see a special treat for the Chicago Rail Fans, a new Empire Belt boxcar making its way West from Empire City. The Penn Central and Burlington share a lot of traffic between their systems. During the late 1960's you could find Burlington units in the New York City area. And there were Penn Central units out in Denver and the Twin Cities. This was continued even into the Burlington Northern era. Sounds like some future P.C.C.M opportunities.


Some more yard action, with cars being switched from the Burlington to the Penn Central.


Here we see our trio of cars that were blocked in Denver. Ready to head east to West Mill and Empire City. We plan on seeing much more traffic being exchanged from points East and West.

The Chicago based SW7 continues to earn its keep moving cars back and forth, building the transfer run back to Penn Central's 59th Street Yard.


Here's the transfer run power the Penn Central has sent over from 59th Street. GP35 #2277 and GP40 #3075. #2277 was a former Pennsy unit. It's a Athearn Blue Box rescue from the Purgatory Box with a eBay purchased mechanism. #3075 is an old Atlas Yellow Box find from eBay. It was already painted in PC colors when I found it. Both are great runners and hope to showcase them in action.
 

Fresh from the Paint Shop. An Athearn ACF Covered Hopper in Penn Central colors. I used a combination of Micro Scale decals and some Montana Gold spray paint for this project. Their "Malachite" seemed like a close match to Penn Central Green. PC Ralph was kind enough to point me to the fine selection of Montana Gold paints. I have several upcoming projects that I plan to use their paint for. When using Montana Gold paint, shake it until your arm goes numb. It requires a lot of mixing. Maybe it's an altitude thing. But the clerk warned me and they were right.

  Some other recent graduates from the Paint Shop. A Life Like Northeast style caboose #18403 and a AHM Pennsy 40ft boxcar in the later simplified lettering style.

Ready to be tacked on the transfer to 59th Street Yard and headed to West Mill and Empire City. Thanks for reading P.C.CM. 45C. Now for more action on the Kingsport Division and N.Y.C.T.L.


Saturday, March 17, 2018

P.C.C.M 45B, The Denver Connection.

Greetings from the Mile High City and the second leg of P.C.C.M.45.  Neal's Atlantic Pacific Railroad kicked off the series with P.C.C.M 45A. http://atlanticpacificrailroad.blogspot.com/2018/03/pccm-45a-rock-ridge-to-selkirk-via.html With the RW-2 running from Rock Ridge to Weehawken.


Upon reaching Weehawken, there is a crew change for the trip to West Mill and Selkirk on WV-2.


P.C.C.M. 45B starts 2000 miles to the West at the 31st St Yard in Denver. The 31st St. Yard is the western end of the Burlington's Chicago to Denver mainline. We'll start the action with the local switcher, just arriving in the yard with three cars scheduled to be sent East to Chicago.


 A CB&Q GP-7 Black Bird leads the train through the Yard on its way to the classification tracks.


   These three cars are destined to be delivered to destinations on the N.Y.C.T.L and KP&W.


      NYC #892012 is loaded with High Altitude Hops for Cavendish Spirits.


Rock Island Boxcar 35062 is loaded with cases of beer from the Tivoli Brewery in Denver. It's headed for Ralph's grocery in Empire City. Some Bock Beer and Denver Beer to serve to new thirsty Ralph's Grocery customers. 1/87th ATJOE can vouch for the Tivoli products firsthand!


Finally Penn Central Hi-Cube Boxcar 272742 loaded with auto belts and radiator hoses for ACME Auto Parts from Gates Rubber Company in South Denver. Just blocks away from the former Caboose Hobbies site on South Broadway and I-25.


Ready to roll out to the classification tracks and on the next train to Cicero Yard in Chicago. We'll join up with the trio tomorrow and their connection to the Penn Central.


Some other guests hanging out at the 31st St. Yard. First off CB&Q GP40 #179. This unit is a backdated Athearn Blue Box GP40-2, with older style dynamic brake and radiator fans.


    Next up is a Proto 2000 SD-7 #300 in the original Burlington "Black Bird" scheme.


  Two Chinese Red units wrap things up. Proto 2000 SD-9 #358 and a Athearn U30C #893.


   Stay tuned, the action will continue tomorrow at Chicago's Cicero Yard. See you soon!

Sunday, March 11, 2018

DIY Penn Central Handrail Project.

Greetings and welcome back to the Ralston Creek shops for this installment. This project was started as a rescue from the "Purgatory Box". I bought this shell from one of Caboose Hobbies famous "Junque Sales" back in the late Eighties. It languished for almost thirty years until I pulled it out for its time to shine.


The subject at hand is a 1/87th Athearn model of a Penn Central (PRSL) GP38, #2010.


The PRSL was a subsidiary of the Pennsylvania Railroad and later the Penn Central. Looking for replacements for their aging Baldwin switcher fleet, the PRSL ordered several batches of GP38's.
PC 2010 was part of the last batch, ordered after bankruptcy in 1970.


By order of the Bankruptcy Trustee's, the order was diverted to the Penn Central in the fall of 1970.
Some facts about PC #2010. It was ordered without the dynamic brake feature. Had dual cab controls and extended cab. It was equipped with the newer paper box filter. It was delivered with PC noodle logos but Pennsy gold road numbers. I decided the 2010 would be the inspiration for my long lost GP38 shell. One note, I did not add the extended cab feature to my model. 18 scale inches didn't seem worth the extra brain damage to model the extended cab. Otherwise it is true to the prototype.

 The biggest challenge to complete the project was #2010 did not come with handrails. After watching some YouTube videos, I took on the bold move to bend my own handrails. Here's the base material for my project. .016 diameter brass wire. Soft enough to bend, strong enough to hold its shape. I had a factory set of GP38-2 handrails to use as my guide for my replacement set.


The first phase involves the long hood of the locomotive. I had several leftover stanchions from other projects. New stanchions are available directly from Arrow Hobbies. The two sizes you'll need for most projects is the 5/8" Medium Stanchion and the 9/16" Short Stanchions. The uneven appearance of the handrail is easily straightened with pliers after they are set.


The Fireman side is next. Again the wavy appearance is easily straightened with careful plier adjustments.


Next challenge, the front cab handrails.

A close up of the bends with the wire. I use a factory original as my guide to make the bends.


A front view of the Engineer Side of the cab. The brass is very forgiving to mistakes and will let you make adjustments if needed.


Some more wire bending using the factory handrail as the template for the new brass one.


A view from the Fireman Side of the Cab. Slow and steady is the call of the day, with this project.


Some tools of the trade. You will need two pair of pliers to make your bends and adjustments. I started off with using Super Glue to keep all of my work together. I later found clear nail polish worked better and was more flexible and forgiving. (Nail Polish courtesy of my Daughter.)


The completed end rails. I'm glad that I finished the project with the end rails. For me, this was the most challenging part of the project. I would have given up on it, had I started with them first.


Some shots of the glued and painted handrails. From the Purgatory Box to a 1/87th scale replica.


With the addition of some more details, windows and number boards, Penn Central #2010 will soon be placed in revenue service and join the fleet.

Thank you for reading! I hope this will help inspire other rescues from the "Purgatory Box".

Saturday, March 10, 2018

A Caboose by any other name.

Greetings and to be honest I'm really not sure what the title of this post implies, just sounded cool. Last week I got to hangout with my train buddy, Conductor Bruce. He was telling me about the new addition at Caboose Hobbies. I really don't need much of a reason to make a trip to Caboose, being about 15 minutes from my house. But this was enough to go out of my way to see.


A real Caboose for Caboose Hobbies! Not just any caboose either. This one was built here in Denver at the Rio Grande Burnham Shops. A hometown native, finds a new resting spot a few miles from where it was first assembled. Hats off to Caboose Hobbies for saving this piece of local history!


Unfortunately age and the elements had wiped out the road numbers on the side of the caboose. However proof of identity was discovered above the door frame. Rio Grande caboose number 01416 is now identified. The rest of the lettering and paint has held up well after all of these years out in the elements.


     I'm sure D&RGW 01416 will be the focus of thousands of train fans every year.


Seeing D&RGW 01416 inspired me to do a shameless plug for my own caboose project. I've lost my mind and now have started to customize O scale trains. It's not like I didn't have enough HO projects back logged on my list. But this was a fun project to mess around with. Some black paint and Rio Grande decals helped transform this old Lionel caboose, into a hometown favorite.


I found this Lionel Santa Fe caboose on eBay for the staggering sum of $4.00 dollars. I was pleasantly surprised on how cheap the MPC Lionel era items cost. So I bought three of them. The other two will be for a future post. I don't know what type of printing they used on this caboose, but it is some tough stuff. I tried my Solvaset trick on it and didn't even budge it. I then tried John R's 91% rubbing alcohol trick on it. It slightly faded the lettering. I finally had to breakout some 400 and 600 grit sandpaper to remove the lettering. It was not going to let go of its Santa Fe heritage without a fight.


It was a fun project and will add some local flavor to my O scale collection. I recently found out the 1:1 scale version of D&RGW 01447 was saved and moved to a local museum here in Denver. I'll have to track it down and get some shots of it as well. I don't know if it retained its original paint scheme like this one or if it got repainted into the orange "action" scheme like 01416. Thanks for checking out the Blog!!!!